This example shows how to create and configure ISL Private Cloud of servers and how to place it behind a reverse proxy serving as a loadbalancer as well.
Prerequisites
- At least 2 servers that will serve as nodes in the ISL Private cloud
- A server that will serve as a reverse proxy
- Two or more Corporate Server Licenses
Note: Please contact us (sales@islonline.com) for more information on purchasing appropriate licenses.
Important: In example below we will be using 2 servers for ISL Private Cloud and one additional server serving as a reverse proxy. The domain isl.company.com is used in the example, you should replace it with your domain on which ISL Private Cloud will be accessible. The example can be easily adapted to include more than 2 servers in the cloud. The following notation applies in the example for the IP addresses:
- Reverse Proxy Server - A.B.C.D
- ISL Private Cloud Server 1 - E.F.G.H
- ISL Private Cloud Server 2 - I.J.K.L
Step 1
Configure ISL Private Cloud as described in the ISL Private Cloud manuals:
- Define Servers
- Assign Licenses
- Create Packets
- Firewall Configuration
- Installation to the Servers
- Private Cloud Configuration
Important: Follow the manuals above but do not configure the DNS zone, as reverse proxy will be responsible for that.

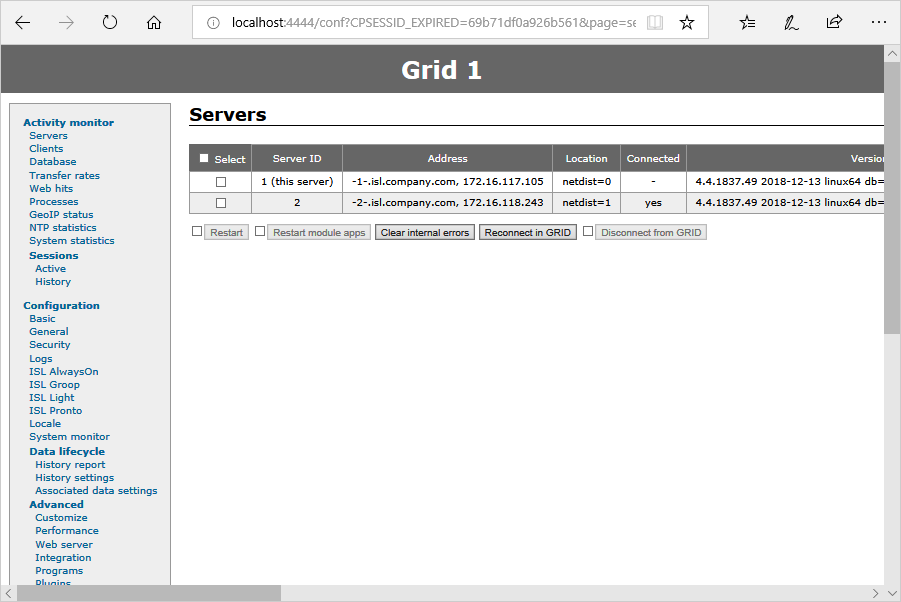
At the end of Step 1 you should have all your servers connected in the grid - they will be listed in the Servers tab in ISL Conference Proxy configuration.
Step 2 (Reverse Proxy Server)
Install HAProxy on the server that will serve as a Reverse Proxy and make sure that the domain name (in our case isl.company.com) resolves to the IP address of the Reverse Proxy Server (isl.example.com -> A.B.C.D).
Note: There are multiple different programs that provide the Reverse Proxy functionality (HAProxy, Apache, nginx. We will be using haproxy in our example since its one of the simplest to set up.
Step 3
Configure the HAProxy to serve as reverse proxy and load balancer for ISL Private Cloud, by editing its configuration file (/etc/haproxy/haproxy.cfb) . You can use the following configuration file as an example:
global
   log /dev/log local0 debug
   daemon
   maxconn 256
   tune.ssl.default-dh-param 2048

defaults
       mode http
       timeout connect 5000ms
       timeout client 50000ms
       timeout server 50000ms
       option forwardfor

frontend myhttp
       bind *:80
       default_backend bk_http

frontend myhttps
	bind *:443 ssl crt /etc/ssl/private/myssl.bundle ciphers ECDHE-RSA-AES128-GCM-SHA256:ECDHE-ECDSA-AES128-GCM-SHA256:ECDHE-RSA-AES256-GCM-SHA384:ECDHE-ECDSA-AES256-GCM-SHA384:DHE-RSA-AES128-GCM-SHA256:DHE-DSS-AES128-GCM-SHA256:kEDH+AESGCM:ECDHE-RSA-AES128-SHA256:ECDHE-ECDSA-AES128-SHA256:ECDHE-RSA-AES128-SHA:ECDHE-ECDSA-AES128-SHA:ECDHE-RSA-AES256-SHA384:ECDHE-ECDSA-AES256-SHA384:ECDHE-RSA-AES256-SHA:ECDHE-ECDSA-AES256-SHA:DHE-RSA-AES128-SHA256:DHE-RSA-AES128-SHA:DHE-DSS-AES128-SHA256:DHE-RSA-AES256-SHA256:DHE-DSS-AES256-SHA:DHE-RSA-AES256-SHA:AES128-GCM-SHA256:AES256-GCM-SHA384:AES128-SHA:AES256-SHA:AES:CAMELLIA:DES-CBC3-SHA:!aNULL:!eNULL:!EXPORT:!DES:!RC4:!MD5:!PSK:!aECDH:!EDH-DSS-DES-CBC3-SHA:!EDH-RSA-DES-CBC3-SHA:!KRB5-DES-CBC3-SHA:@STRENGTH no-sslv3
	default_backend bk_https

backend bk_http
       cookie SRVNAME insert
       balance roundrobin
       server s1 E.F.G.H:7620 cookie S1 maxconn 32
       server s2 I.J.K.L:7620 cookie S2 maxconn 32

backend bk_https
       cookie SRVNAME insert
       balance roundrobin
       server s1 E.F.G.H:7621 cookie S1 maxconn 32
       server s2 I.J.K.L:7621 cookie S2 maxconn 32
SRVNAME cookie is inserted to provide "sticky" sessions, meaning that once a server inside your ISL Private Cloud is delegated to a user it won't be changed during his session, which would lead to a loss of functionality.
Note: If you have more servers in your ISL Private Cloud, list their addresses under the backend bk_http and backend bk_https sections.
Step 4
Open ports 7620 and 7621 between Reverse Proxy Server and servers in you ISL Private Cloud, these ports are used by HAProxy to comunicate and delegate traffic. Port 7620 is used for http and port 7621 is used for https traffic.
Step 5 (ISL Private Cloud)

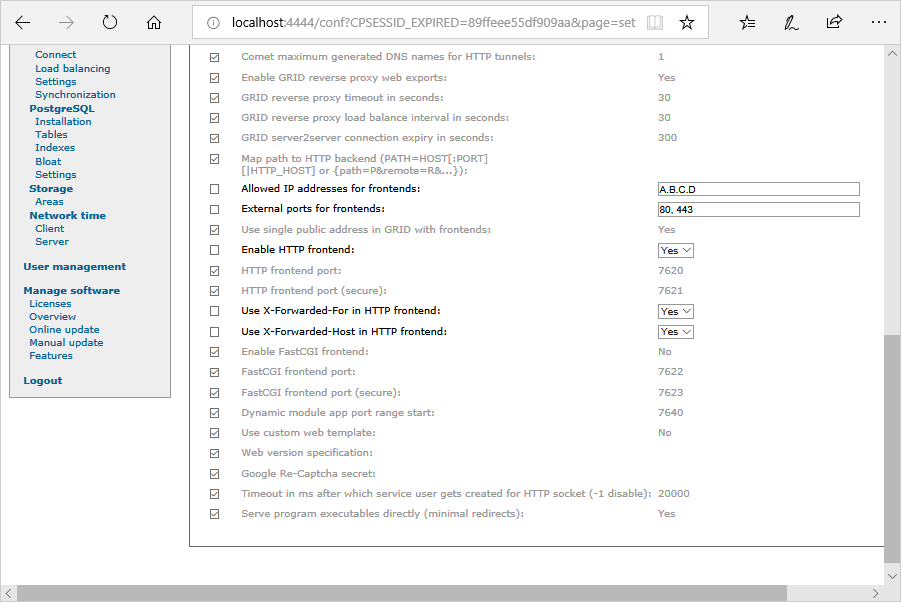
Configure your ISL Private Cloud to use the Reverse Proxy Server as the frontend. ( Steps are additionally described in this topic: Reverse Proxy). In the configuration open Configuration -> Advanced -> Web server and change the following settings:
- Allowed IP addresses for frontends - Enter the IP address of you Reverse Proxy Server (A.B.C.D)
- External ports for frontends - Enter ports 80 and 443, used for http and https traffic respectively.
- Enable HTTP frontend - Set to Yes.
- Use X-Forwarded-For in HTTP frontend - Set to Yes.
- Use X-Forwarded-Host in HTTP frontend - Set to Yes.
the click "Save".
Step 6 (Reverse Proxy Server)
Launch HAProxy with the following command:
haproxy -f /etc/haproxy/haproxy.cfg
Step 7

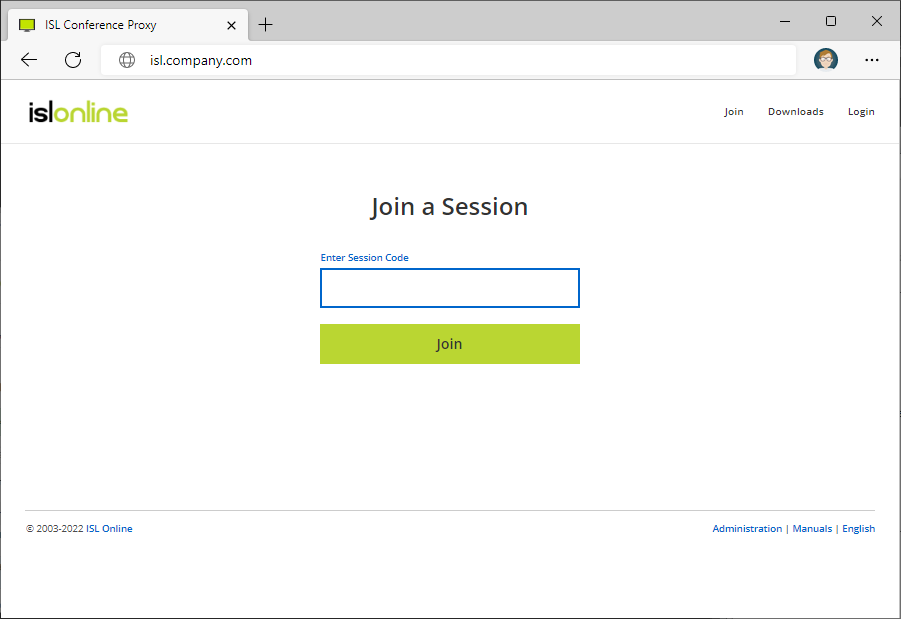
Open up your domain name (e.g. isl.company.com) in your browser. If you see the landing page of ISL Conference Proxy your configuration was successful.
Note: If everything seems fine but it still does not work properly or if you get stuck at one of the steps, you can contact us via e-mail (support@islonline.com) or come to our live chat (at http://www.islonline.com/) and we will be glad to help.